Project note
Pragmatic Audio PEQ: five levels of EQ, from just make it sound better to every setting
A cross platform, system wide parametric EQ for headphones and IEMs, built phone first, explained as five levels of experience.
I have been building PEQ tools in my spare time for years (devicePEQ is probably the best known), and my plan this time was a full PEQ app that would ‘uplift’ your headphone experience, which is why I originally wanted to call it UpLifting. Then I spotted that a new iOS 27 API makes a system wide PEQ app possible on the iPhone, so I made that the first goal. Apple Music, Tidal, Qobuz and Spotify each have an EQ of some sort (and Roon has an excellent parametric one) but they all only touch what you play inside that particular app. As far as I know this is the first dedicated system wide PEQ app for iOS.
I had started on Android originally, so I decided to use the same cross platform code for everything (Flutter and Dart on top, with low level C and C++ libraries underneath for the audio), and that is why the same app now also runs on Mac and Windows, and on Android through Google Play. I tested it with a lot of headphones, including my HD 600 (which needs a bit of sub-bass) and some recent FiiO / Jade Audio headphones like the JT9 (which need a little treble tweak), but getting my AirPods Pro 3 working seamlessly was one of the main reasons I wanted to do it at all.
Most of the PEQ tools I have seen, including the new PEQ app from the headphones.com team, are really for audio measurement nerds, which makes complete sense because they have the data, and they are really desktop experiences. I wanted something for anyone who is interested in a better headphone experience, so I have tried to explain the app as five levels. If you get into PEQ you are ‘going down the rabbit hole’, and these levels are really about how deep you want to go. I fully expect most people will stay at level 1 (which is fine, and I think that’s how it should be).
Two thank yous before I start. oratory1990 mainly tested the OPRA integration, which I had initially hidden away a little until he persuaded me to put it front and center (you will see that in level 1), and his feedback on the editing changed the app as well, which I will get to in level 2. And when I asked Sean Olive what he thought of the original ‘Uplifting’ app concept, he told me to keep it simple and give users a simple bass and treble adjustment, so those two controls are the cornerstone of the simplest way to use the app.
Getting it running
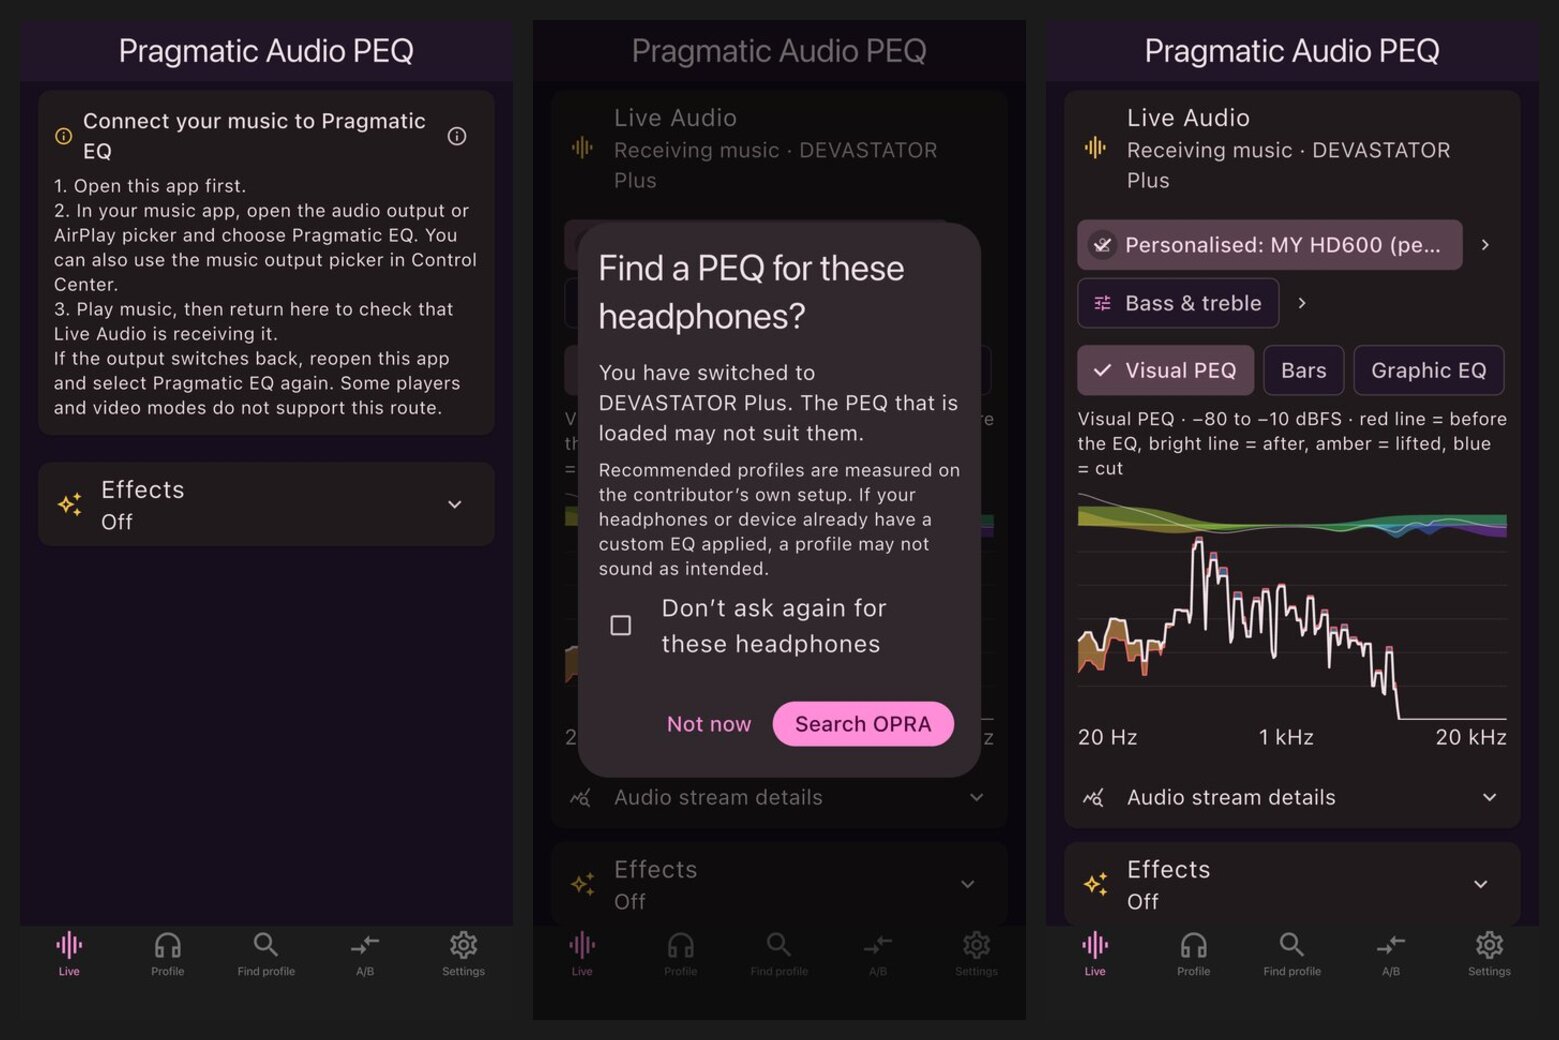 Left: the setup steps on the Live screen. Middle: the prompt when you switch headphones. Right: music playing through a PEQ.
On iPhone you open the app first and then choose Pragmatic EQ as the output in your music app, either from its AirPlay picker or from the output picker in Control Center. Play something and come back to the Live screen to check it is actually receiving, because some players and video modes don’t support this route (the app tells you when that’s the case) and if the output ever switches back you just open the app and choose Pragmatic EQ again. Needing to select Pragmatic EQ is the main limitation on iOS, and I would like to hear how people find it.
When you connect a different pair of headphones the app notices and asks if you want to find a PEQ for them. Recommended profiles are measured on the contributor’s own setup, so the prompt also warns that a profile might not sound right if your headphones already have EQ of their own. You can choose Search OPRA to look one up, Not now, or tell it not to ask again for those headphones.
First, the fun part
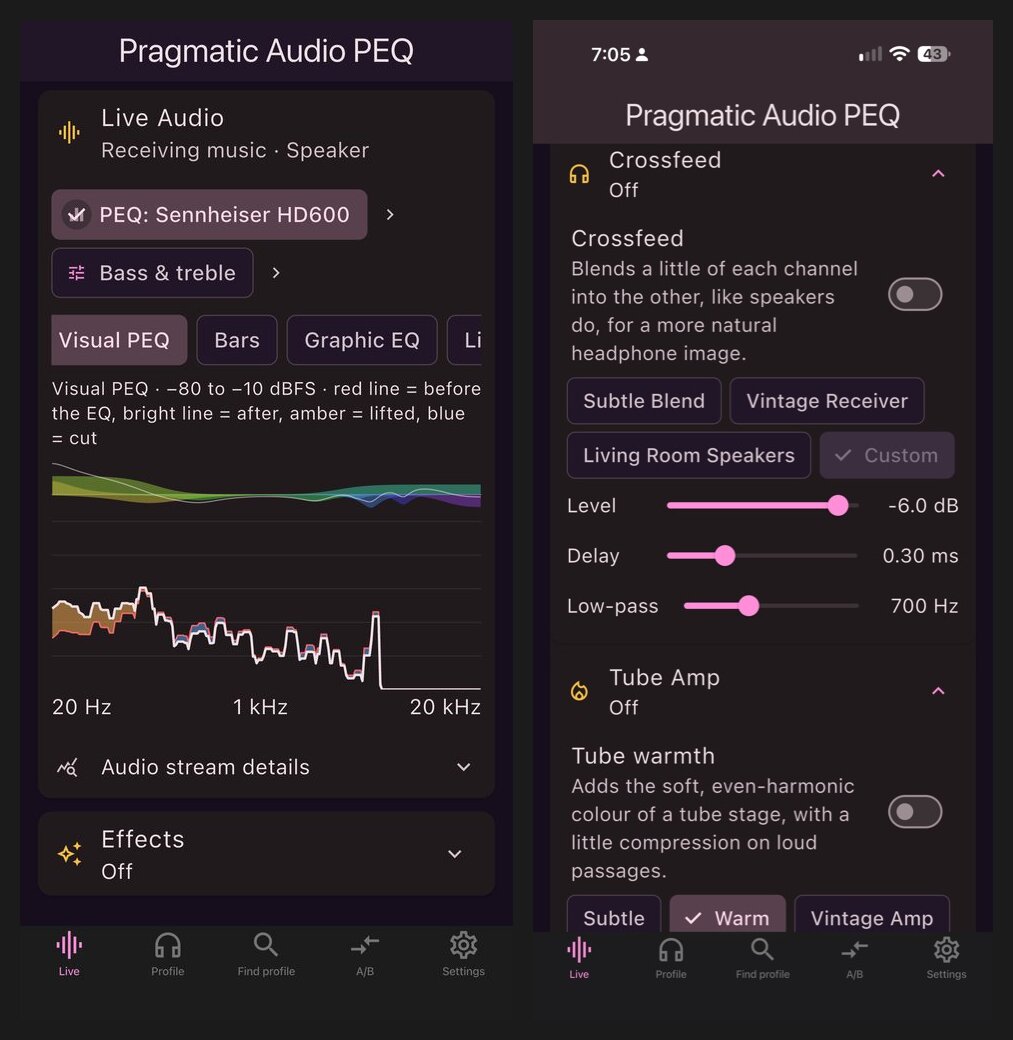 Left: Live with the Visual PEQ view. Right: Crossfeed and Tube Amp, each with a few presets.
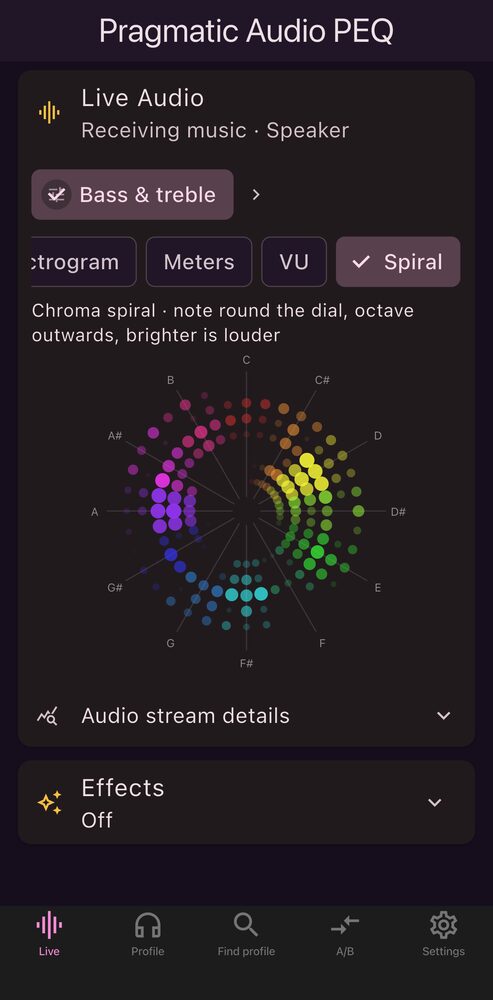 The Spiral view is one of eight ways to watch what you are playing.
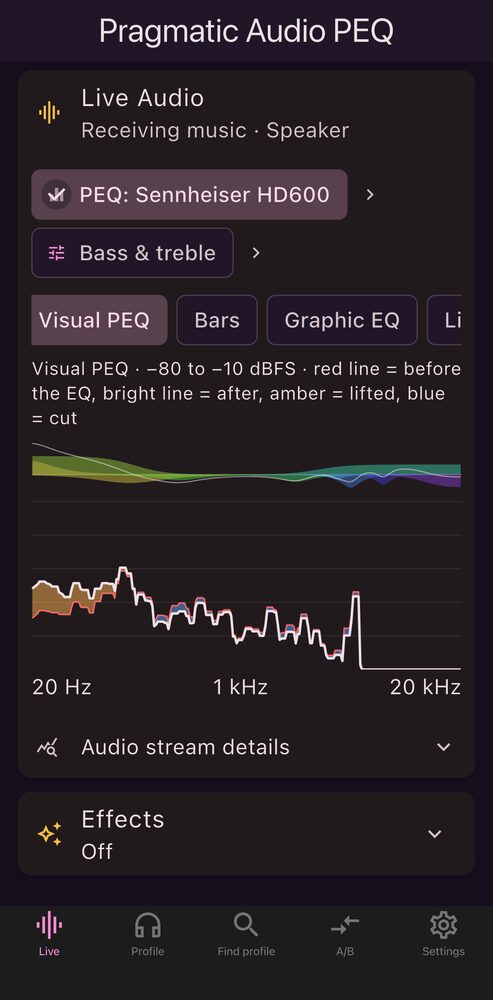
Everything you play goes through the app, and the Live screen shows you what you are hearing in eight different views. My favourite is Visual PEQ which draws what your EQ is doing to the music as it plays, so it’s a nice way to see what a boost at 3 kHz really does to a song you know. I use the app mainly on my iPhone and on my FiiO M25 DAP, and as the M25 has a much older CPU and GPU than my other devices it turned out to be a great test bed for optimising the visualisations.
There are also three effects. Crossfeed softens the hard left and right separation you get with headphones, a tube amp stage adds a little warm saturation, and Vinyl adds, well, vinyl. None of these are about accuracy (obviously) but I think audio should be fun. The catch is that the way Android lets an app into the audio path means it cannot do as many of these effects as the iPhone version can, and Crossfeed is the one you will notice is missing.
Level 1: give me a PEQ that works
You have headphones, someone has already measured them, and you want the correction, that is all.
Load one from OPRA
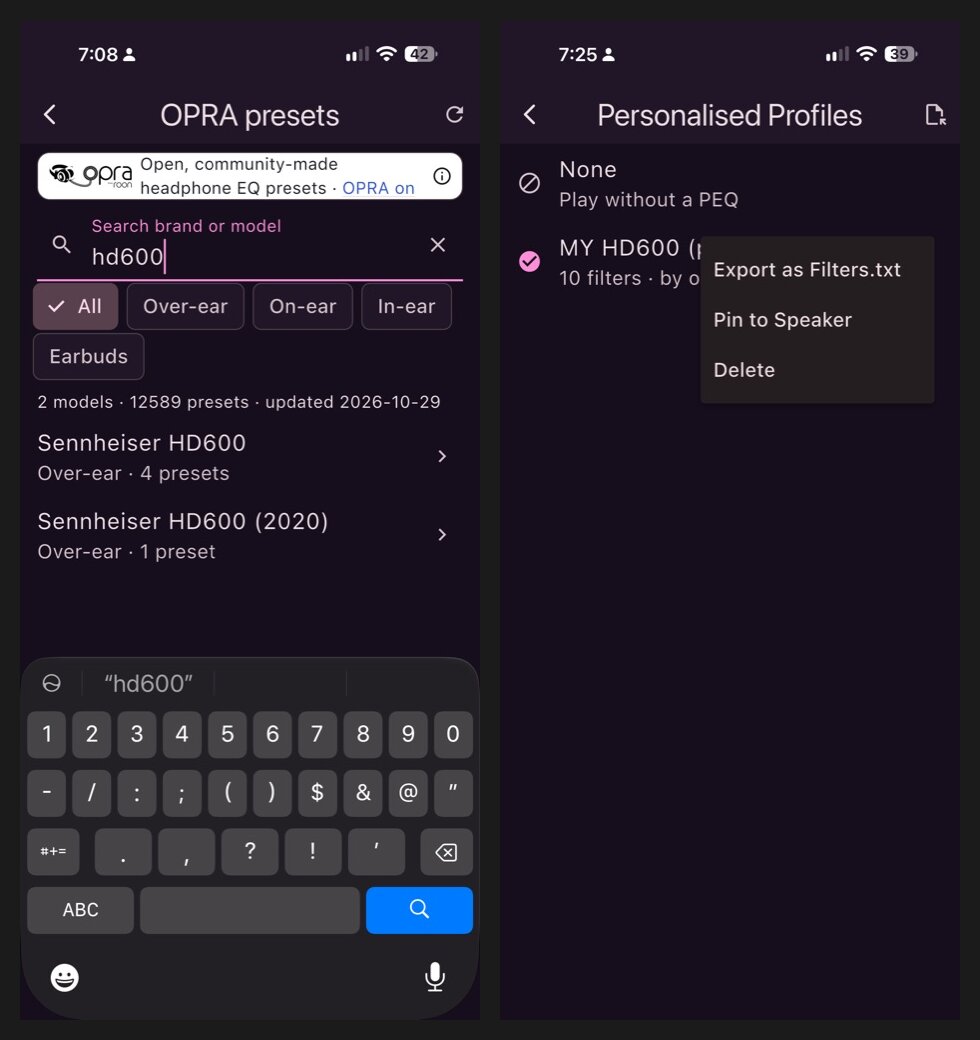 Left: searching OPRA for “hd600”, which covers thousands of models. Right: the menu next to a saved profile, where Pin lives.
The app has OPRA built in, which holds thousands of headphones and IEMs, so you search for yours, pick a preset and load it, and it is live straight away in every app. Each preset shows who made it. For the Sennheiser HD 600, for example, the preset is by oratory1990 and the app names him first, followed by the source and the licence.
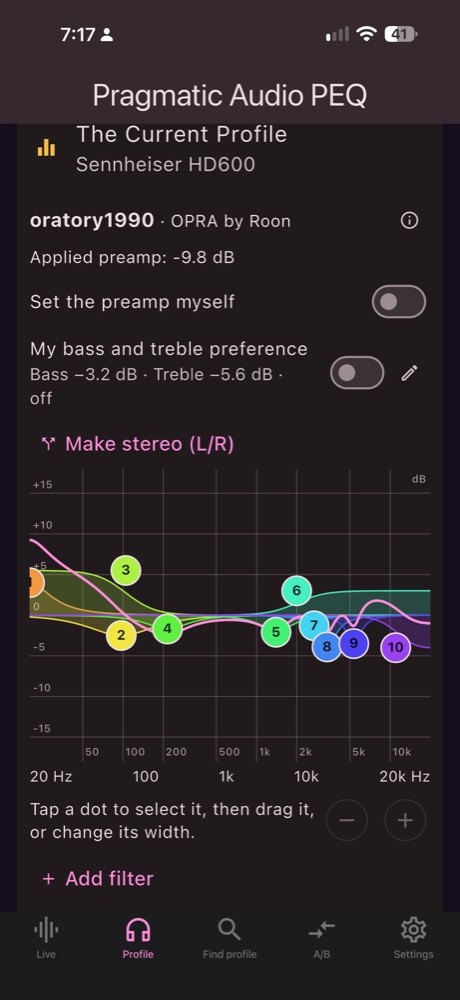 The loaded profile: preset by oratory1990, the applied preamp, the filters on a graph.
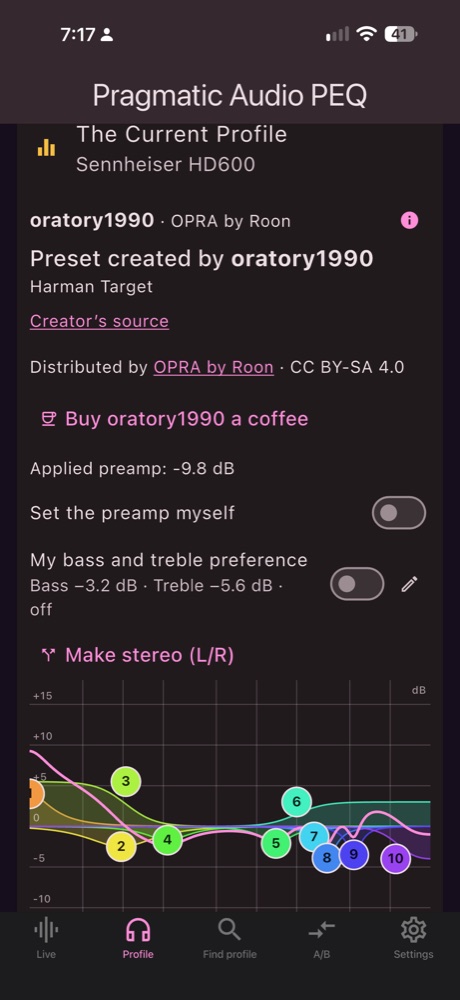 Tap the info button and you see who made the preset, where it came from and its licence.
This is why I am glad oratory1990 pushed me. His presets are the reference many of us start from, and putting OPRA front and center means a new user starts with a proper correction and not a blank graph. The credit also stays with a preset even if you edit it and save your own copy.
Bass and treble are yours
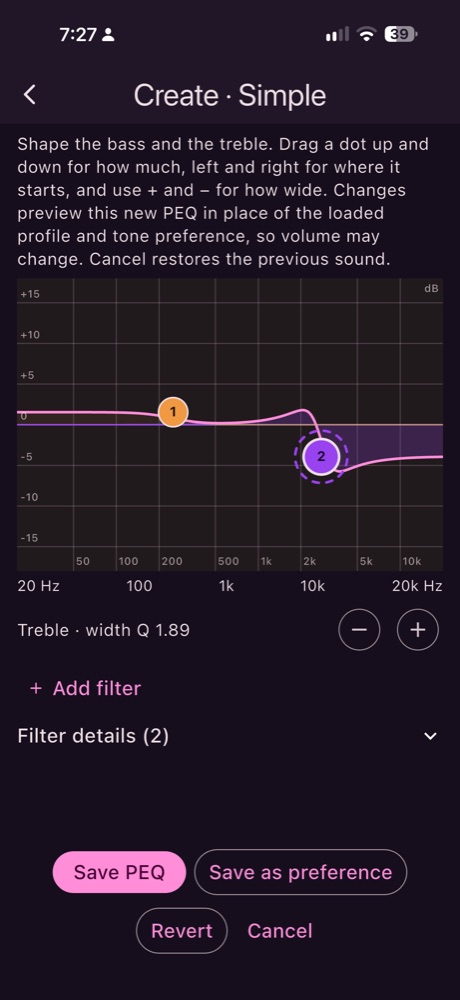 Create, Simple: a bass shelf and a treble shelf. Drag the dots and listen.
A correction gets a headphone to an accurate starting point, but how much bass you want and how much treble you can stand is taste, and taste does not change when you change headphones. This is where Sean Olive’s advice came in. Create has a simple screen with a bass shelf and a treble shelf, you drag two dots, you hear the change as you make it, and then you save the result as your bass and treble preference. My HD 600, for example, needs a bit more sub-bass, which is exactly the sort of tweak the bass shelf is for.
I keep that preference separate from the PEQ. It sits on top as its own layer with its own switch and it is never merged into the profile, so if you like a bit more bass than neutral you set it once and it follows you from your open backs to your IEMs to whatever you buy next. You can edit the profile and the preference separately and switch either one off to hear the difference.
Let the PEQ follow your headphones
If you move between, say, AirPods Pro 3 and a pair of Bose QuietComfort headphones you do not want to load a different PEQ by hand every time. Open the menu next to a saved profile and choose Pin, and from then on when those headphones connect the app loads that profile by itself and tells you. It only acts when the device changes, so if you pick something else by hand afterwards it leaves you alone until the next connection.
Level 2: I want to make my own
You have good headphones and you are curious what you can do yourself, but you are not ready for measurement graphs.
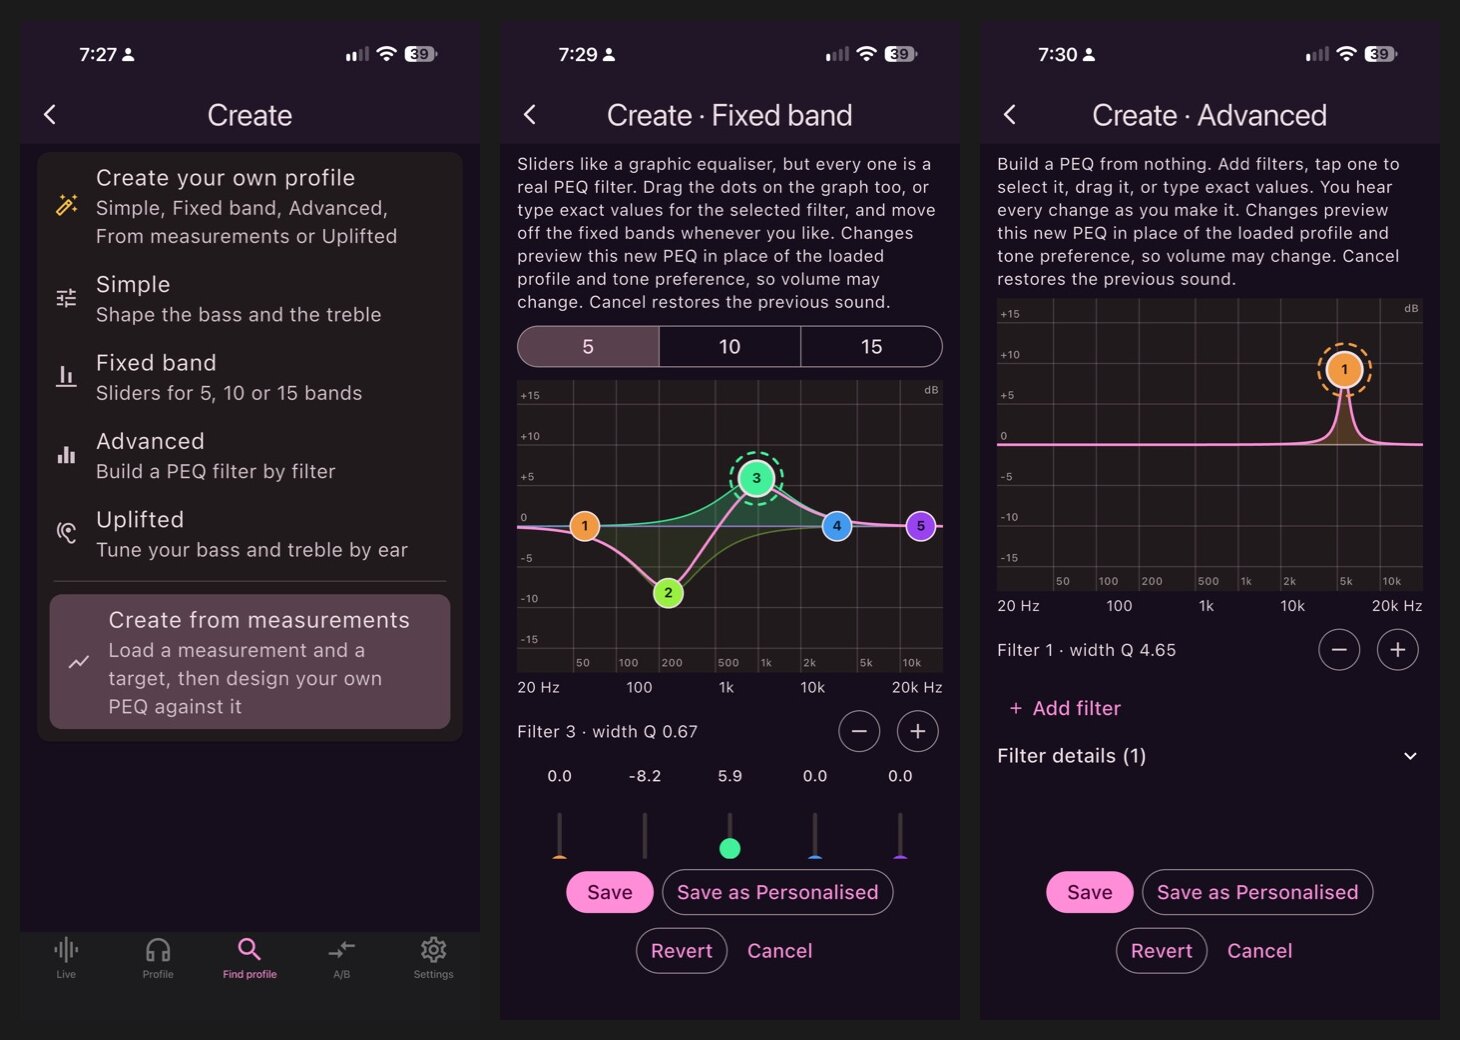 Create offers Simple, Fixed band, Advanced, From measurements and Uplifted.
The editor is the same one you see for any loaded PEQ. Each filter is a dot on a graph, you drag it for frequency and gain, change the width, or type exact numbers if you prefer, and each filter draws its own coloured curve so you can see what it contributes. Every change is live in the music. This is probably what I am most proud of in the whole app, because getting the visual editing as smooth as it is now took a significant amount of time. The first version was fiddly on a phone, and oratory1990’s initial feedback was that editing a PEQ was not as simple as it should be on a small touchscreen, so I reworked it, moved the Q adjustment below the graph, and then spent a long time getting it right on every platform. There is also an advanced editor that starts from nothing, and when the graph gets crowded you can pinch to zoom in on a region.
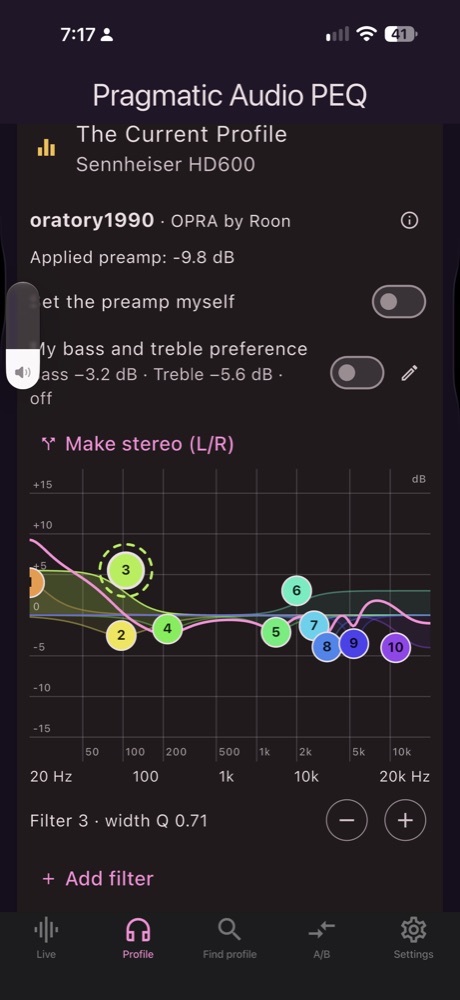 A selected filter, with the width (Q) controls below the graph.
I think this is where people learn the most. Move a filter around while a song you know is playing and you quickly hear what 200 Hz does compared with 2 kHz, and when you are happy you can save it under your own name (if you edit an OPRA preset and save it, it keeps its credit).
Level 3: I want to start from measurements
Now you are in the ‘weeds’, you have heard of graphs and targets and you want to build the PEQ from a measurement of your own headphones or IEMs. I am reviewing the Aune AR3000 and the FiiO FT15 at the moment, and both are pretty great, but like most headphones they can be made better with some PEQ, so they are the kind of thing this level is for.
Both crinacle (Hangout Audio) and Super* Review gave me permission to link their measurements and matching targets from inside the app, and I am grateful to both of them. The app only reads a curve to design your EQ, nothing is downloaded, saved or exported, and every measurement stays with the person who made it. Pragmatic Audio’s own measurements are in there too. If you want to use a measurement site that is not built in you can add it yourself in Settings, but that is your choice, and Settings reminds you to check with the site’s owner first.
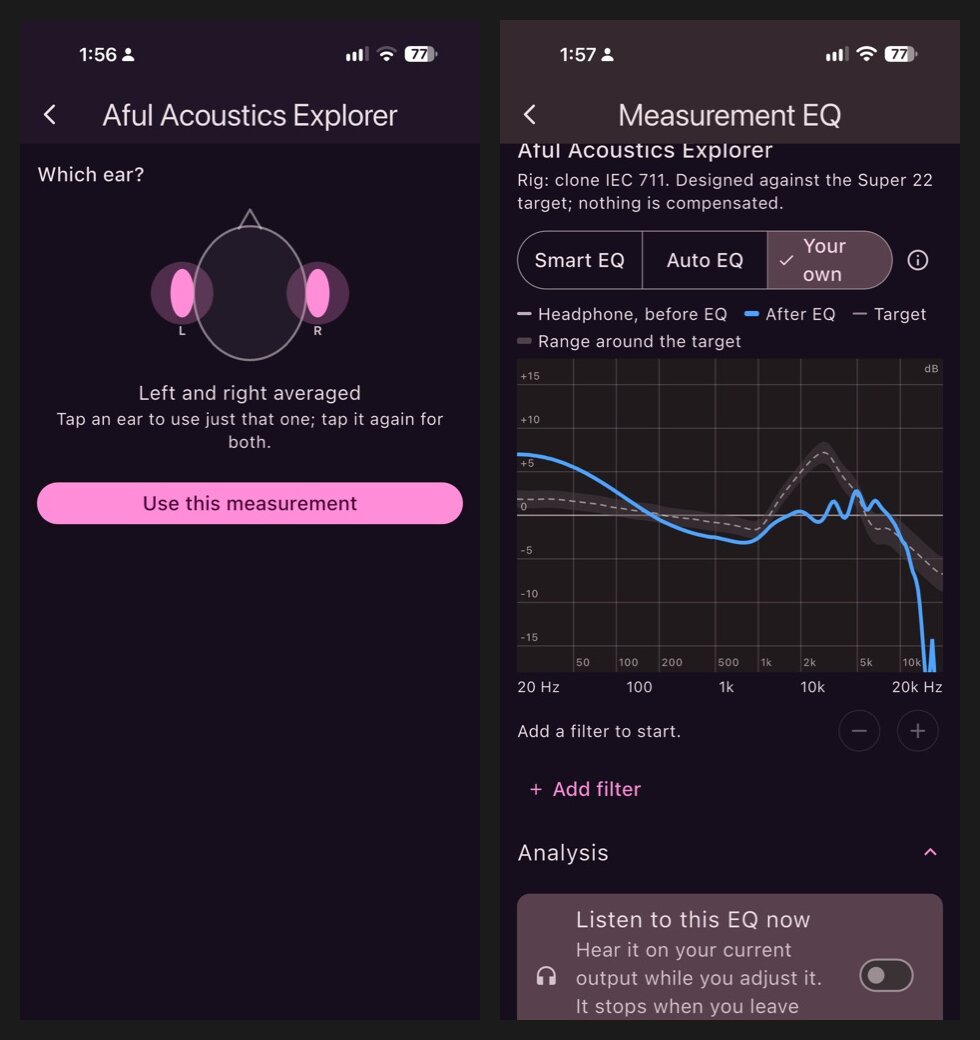 Left: pick a measurement of your headphones or IEMs. Right: Your own starts with no filters.
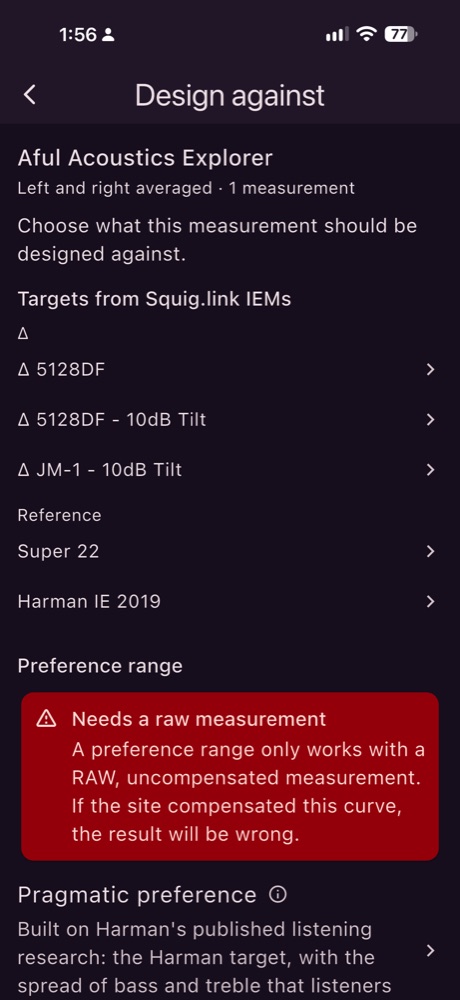 Then choose what to design against: a target, or a preference range.
You pick a measurement, then a target to design against, and the app offers two ways to fit it. Auto EQ is the classic approach: it follows the target closely and uses as many filters as it needs. Smart EQ is a variant I wrote that takes a gentler line, it concentrates on fixing the big midrange problems, suggests bass and treble shelves rather than chasing every small wiggle, and ends up with fewer filters. There is also a third choice, Your own, which starts with no filters at all.
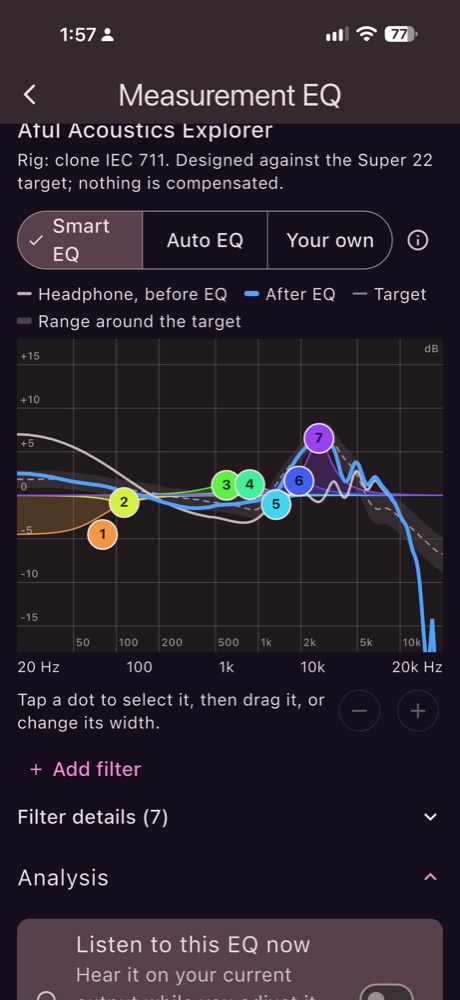 Smart EQ: the measurement before the EQ, after it, the target and the range around it.
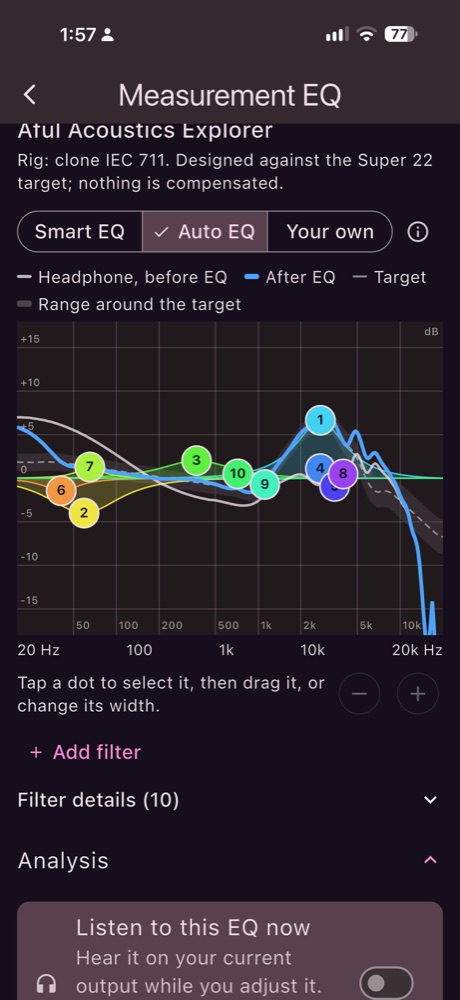 Auto EQ on the same measurement, with more filters.
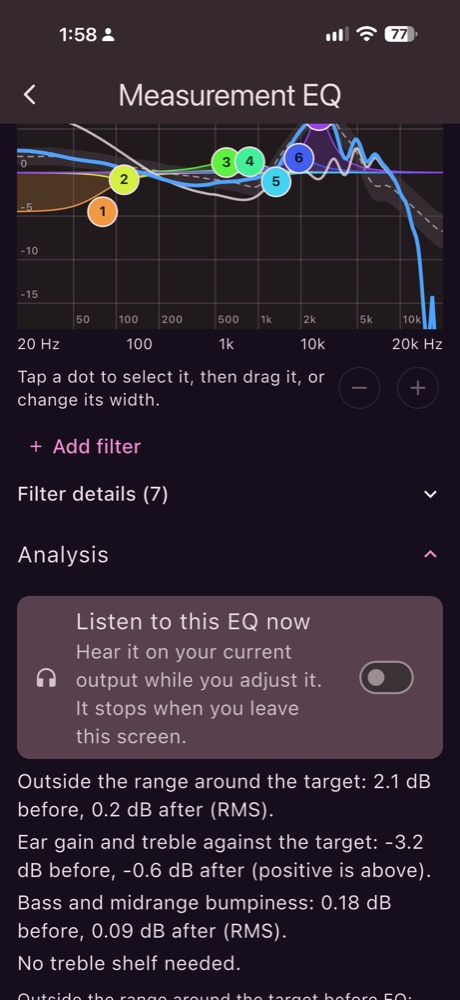 The Analysis section puts numbers on the before and after.
The graph can show the measurement as measured, which is the usual way you see it on a measurement site, or tilted against the ‘diffuse field’. You see the before and after, you can listen to the result before you use it, and then you edit it like any other PEQ.
Level 4: I can hear that treble peak
You do your listening carefully, and you know a certain headphone is a little too sharp for you in a way no measurement explains.
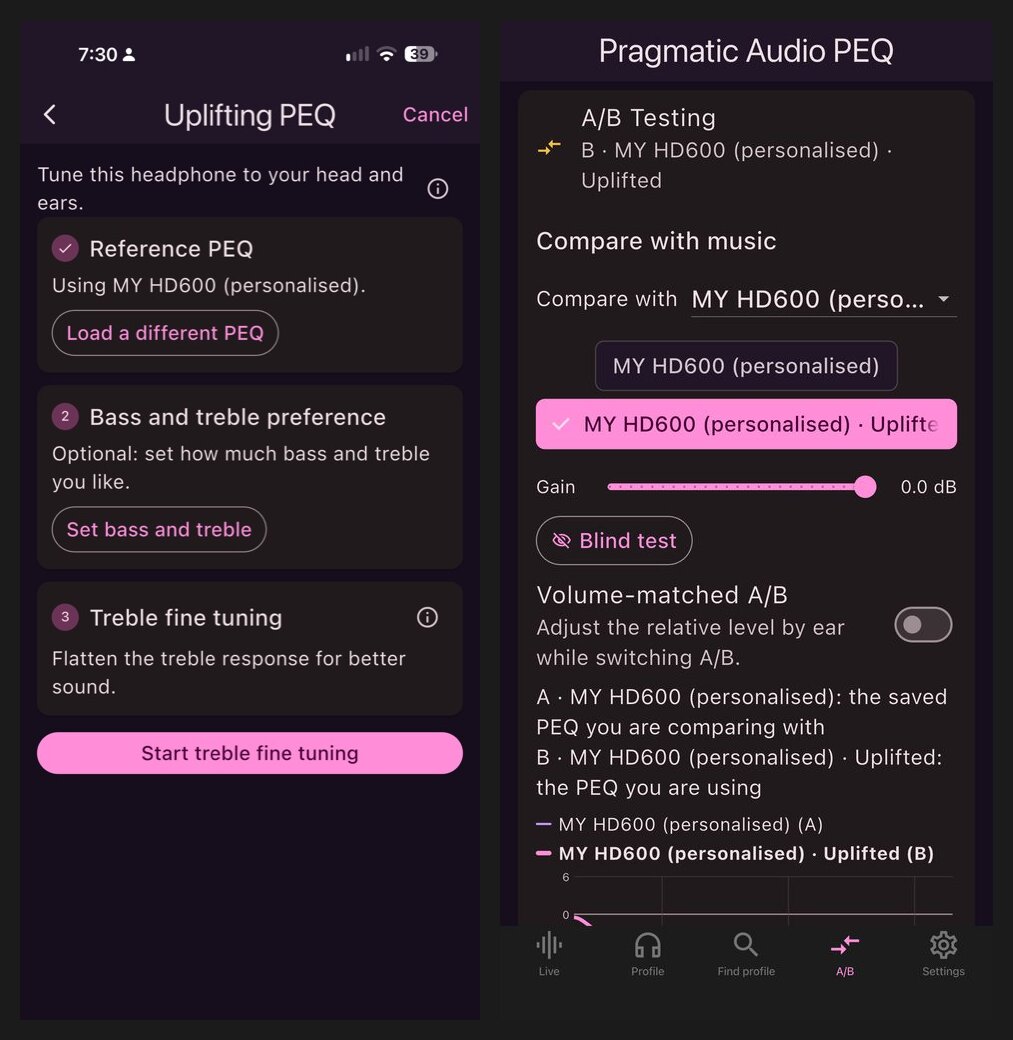 Left: Uplifting, with the reference PEQ, your bass and treble preference and the treble fine tuning. Right: A/B testing between two PEQs.
This is what Uplifting is for, and I should be honest that I took it directly from the tool I had already built for pragmaticaudio.com, so it was a port more than a new invention. Ear canal length, the shape of your pinna and how a headphone seats on your head all move the treble resonances by an amount a measurement rig cannot know, so a PEQ computed for the rig can be exactly right for the rig and still a little off for you.
Uplifting works above about 4 kHz and splits the treble into bands that follow the ERB scale (Equivalent Rectangular Bandwidth), which approximates how selective a particular region of your basilar membrane in the cochlea is for frequency. My working theory is that treble sensitivity often comes from one or more of those regions being extra sensitive, so one narrow range sounds ’louder’ to you than it should. The app plays a slice of noise, compares it against a reference noise and asks you to make it match, and where you turn a slice down it records that. It then fits a small set of peaking filters to what you chose, a finer pass lets you refine the areas where something changed, and because you only touch the specific ranges that bother you the overall treble stays as it was.
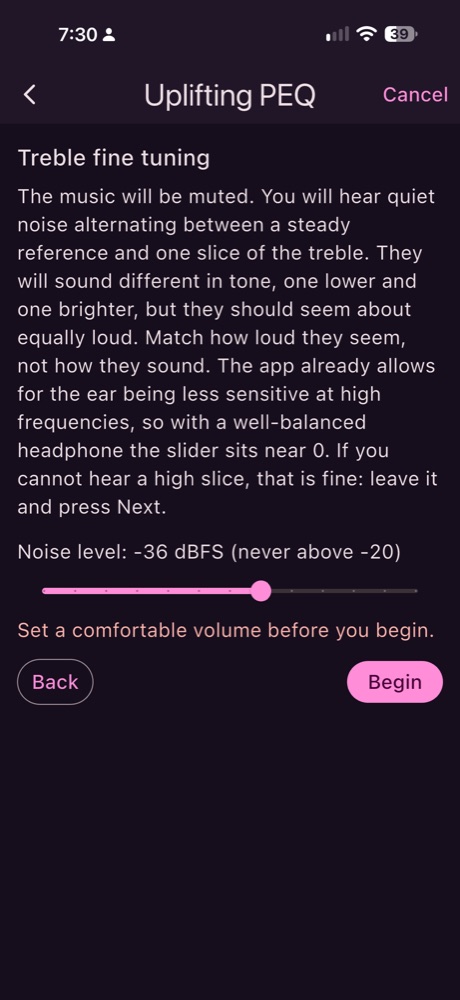 The music is muted for the listening part, and the noise level is yours to set.
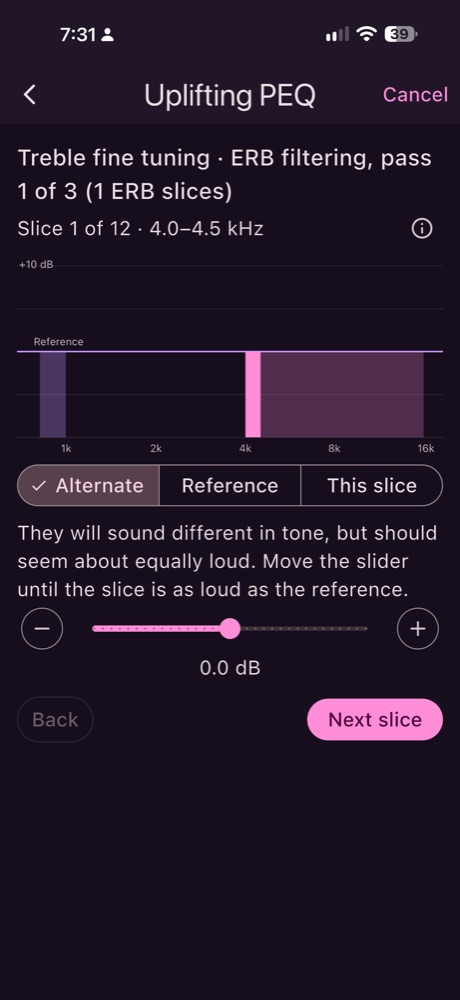 Pass 1 of 3: a slice of noise compared with the reference. Slice 1 of 12 covers 4.0 to 4.5 kHz.
At the end you review the filters and the screen shows exactly what will be saved, which is the loaded PEQ with the new filters added, and your bass and treble preference stays a separate layer like it does everywhere else.
Checking you are not fooling yourself
Developing the A/B testing was a lot of fun, and the blind test was the best part of it, because having full access to manipulate the audio dynamically is a fantastic capability. A/B testing switches between your PEQ and no PEQ while the music plays. Turn on volume matched A/B first, because the louder of two things usually sounds better, though even then it is still only a quick sighted comparison and you know which one you are listening to.
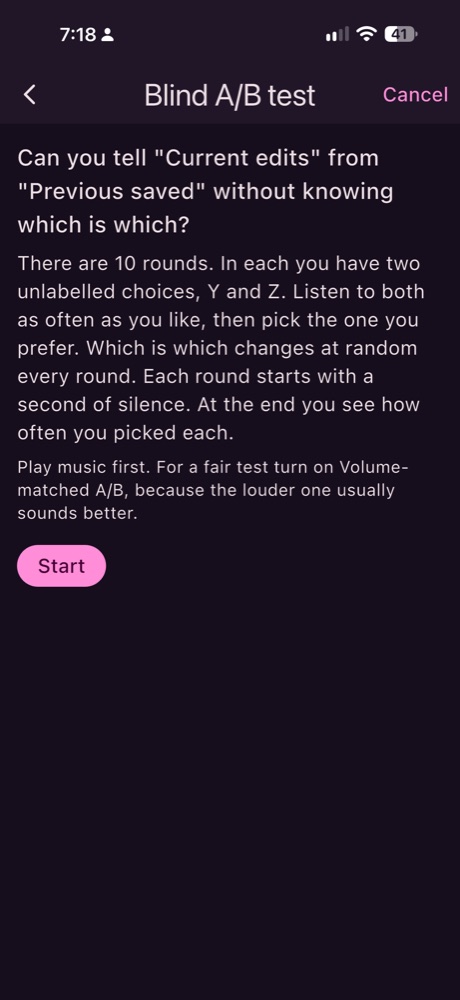 The blind test explains itself before it starts.
For something you can trust there is a blind test. It plays two unlabelled choices over ten rounds, your PEQ and no PEQ in a random order, and you pick the one you prefer each time, and at the end it gives you an exact binomial test. Nine out of ten is about a 2% chance by guessing, eight out of ten is about 11% which is not enough to say, and if you land around five then either you cannot tell them apart or the difference is small once the level is matched. I find that humbling in a useful way.
Level 5: let me tune everything
This level is for people who badly want a PEQ and want it exactly right. It is also the part I have been working on most in the most recent build, with the image and .txt import and the tuning of Smart EQ and the other intelligent features.
You can quickly grab an ‘uncompensated’ measurement, even just a picture of a graph. The app reads the axes with the phone’s own text recogniser, finds the line by colour and fits it, and you confirm the result, because a graph read from a photo is only as good as the photo. Then you design against an industry standard target or against preference bounds, which are a range around a target within which most listeners find a headphone acceptable, and the app offers three. One of them is a Pragmatic bound that I built from the published Harman listener research, the original preference bounds and the newer headphones.com bounds.
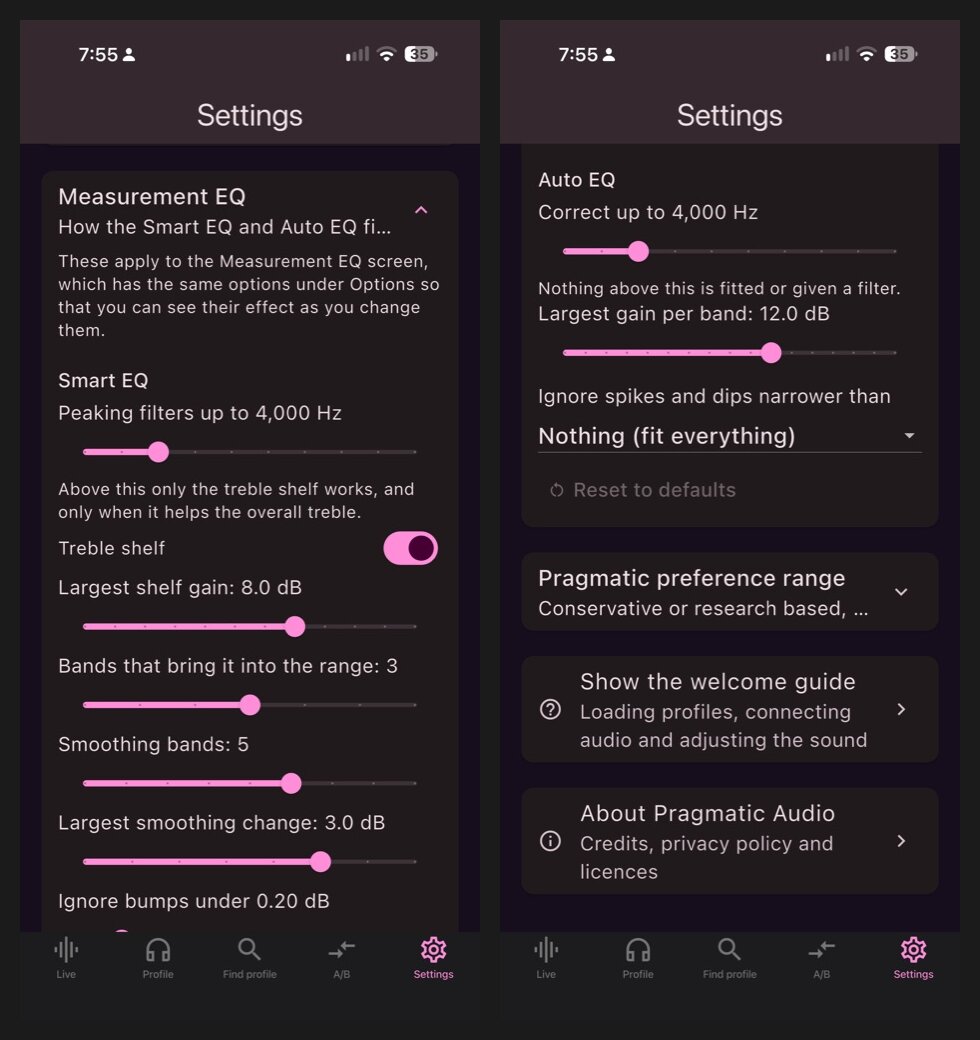 Left: Smart EQ settings. Right: Auto EQ settings and the Pragmatic preference range section.
The Pragmatic range comes with a lot of caveats and I would rather you could see all of them. The bass and treble limits are not directly established percentile boundaries from the research, they are my reading of it. So Settings lets you choose a Conservative range (my default, and a little tighter), a Research based one, or set the four regions yourself: an overall fuzz, bass, presence and treble. A Background research screen lists the papers and talks it comes from, so you can check my work and not just take my word for it.
Beyond that almost every aspect of the fitting is a setting: the highest frequency the filters may reach, the number of filters, how resonances are protected, how shelves are used, and more, so tweak it until the PEQ is what you want.
Where it runs
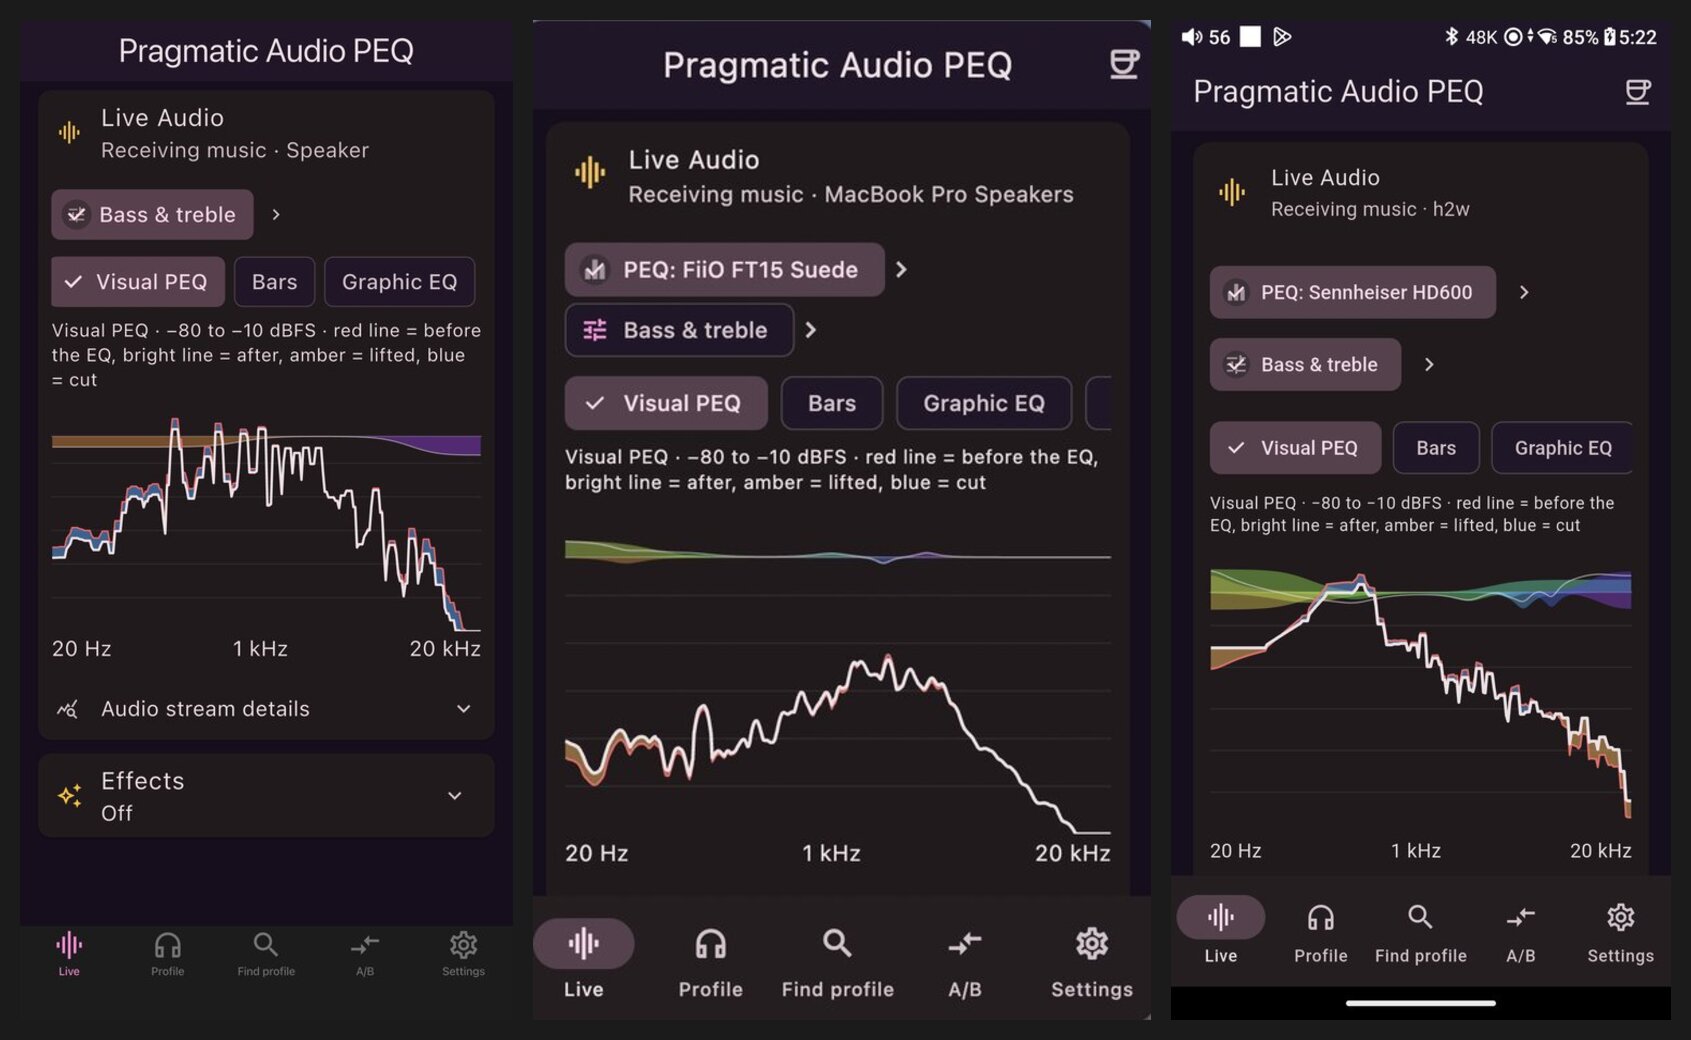 The same Live screen on my iPhone, on the Mac (with the FiiO FT15 profile loaded) and on the FiiO M25 DAP.
The hardest part of the whole project was the low level DSP engine on Android and Windows. The internals of how each system lets you into the audio are so different that sharing common code was a lot harder than I expected, and Android in particular has many quirks that were difficult to get working. The differences you will notice are the two I mentioned earlier: on iPhone you have to select Pragmatic EQ as the output, and on Android the audio integration cannot do as many effects (Crossfeed is the one that’s missing).
Where to get it
Everything is on my apps page: the App Store for iPhone and iPad (iOS 27 needed), Google Play for Android, and the Mac and Windows downloads. The Windows build is an earlier one than the rest, so I’d especially like to hear how it goes if you try it.
I am looking for feedback, because right now I cannot think of anything missing from my side. If you try it, tell me what level you ended up at, I would like to know how many people stop at level 1.